VLC player offers a basic video crop feature to remove the unwanted areas from a video.
The crop feature would also help you to reduce the resolution and file size of the original video by only keeping the relevant portions an cropping out the unwanted regions of a video.
You can crop the video and then save the cropped version as a separate video file. This feature is also useful for removing any black or unwanted edges around any video. You can also remove watermarks from videos by cropping out the watermark text present at the edges.
Before continuing with these steps, make sure that you have the updated or latest version of VLC.
Cropping the Video using VLC player
Step 1
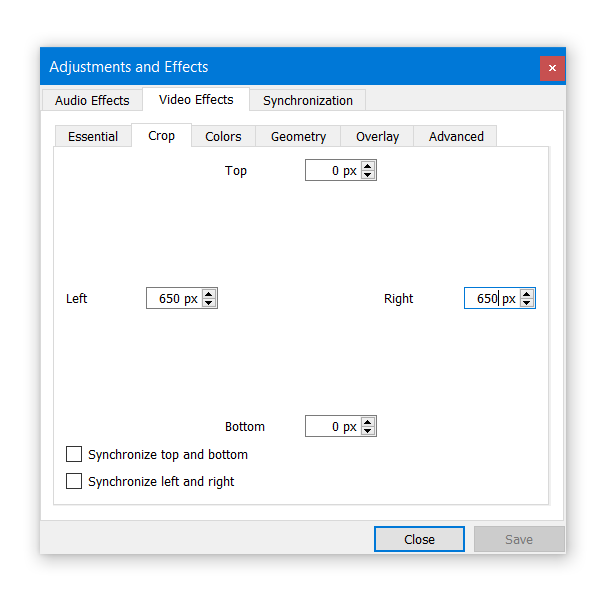
Open the Video in VLC player. Pause the video and then go to Tools > Effects and Filters (Ctrl + E). This will open the Adjustments and Effects window. In the Adjustments and Effects window select the Video Effects tab and then select the Crop tab.
Step 2
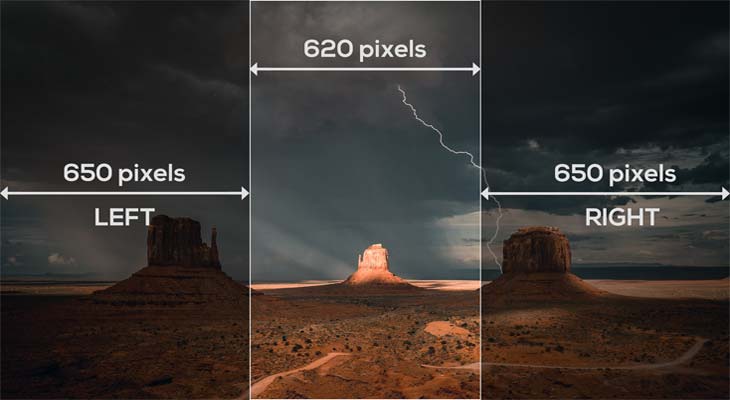
The crop tab would require you to enter the top, bottom, left and right pixel values for cropping the video. In the example image below, the full resolution of the video is 1920 x 1080 pixels.
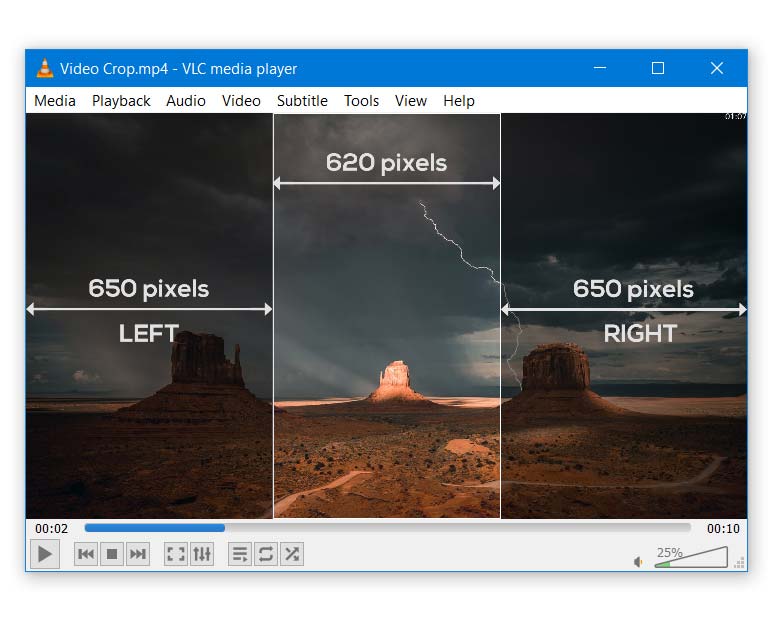
We want to remove 650 pixels from left and 650 pixels from right such that the width of the video is reduced to 620 pixels.
We will enter 650 pixels in the right and left boxes. Since, we won’t be cropping the video from the top and bottom; we will leave the top and bottom values at 0 pixels.
VLC player would show you a live preview as you increase or decrease the pixel value in the boxes. You can find the right value for cropping using trial and error.
Step 3
Note down the pixel values for top, bottom, left and right from the boxes once you are satisfied with the cropped video and close the Adjustments and Effects Window.
Step 4
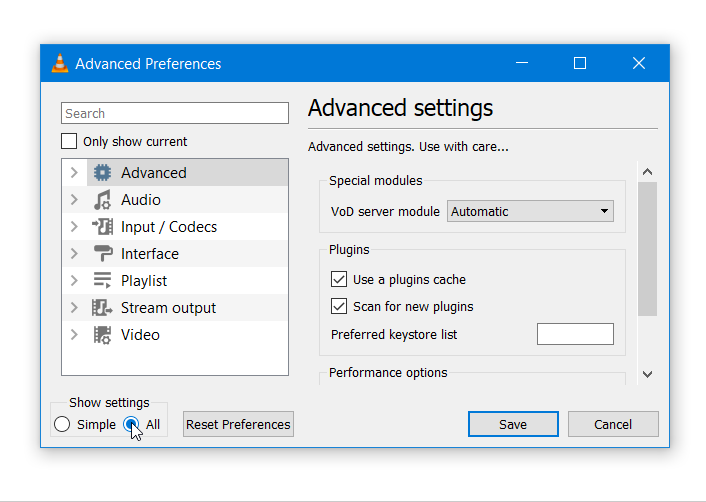
Now, open the VLC Preferences by pressing Ctrl + P or by going to Tools > Preferences. Set the Preferences to All to reveal additional VLC settings.
In the left side panel in the Advanced Preferences window, Expand Video and click on Filters. On the right side tick the check box with “Video Cropping Filter” label.
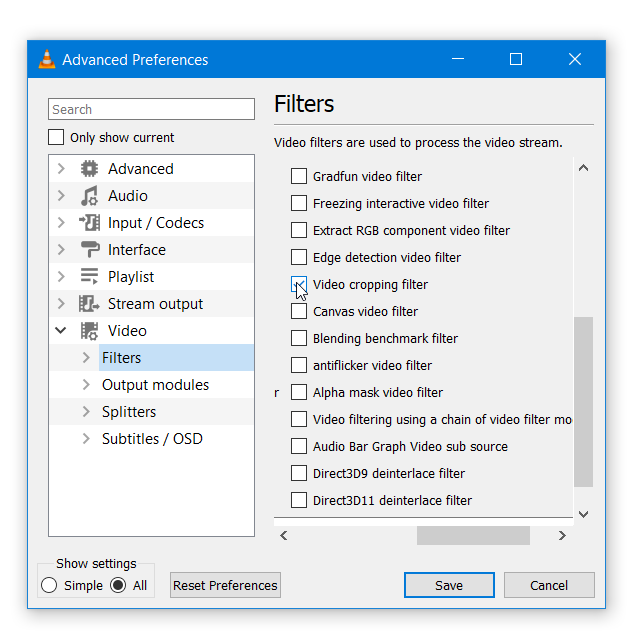
If you can’t find the Video Cropping Filter then look for Video Scaling Filter and click the checkbox to enable it. Before you click on Save, Expand the Filters sub menu and then scroll down and select Cropadd.
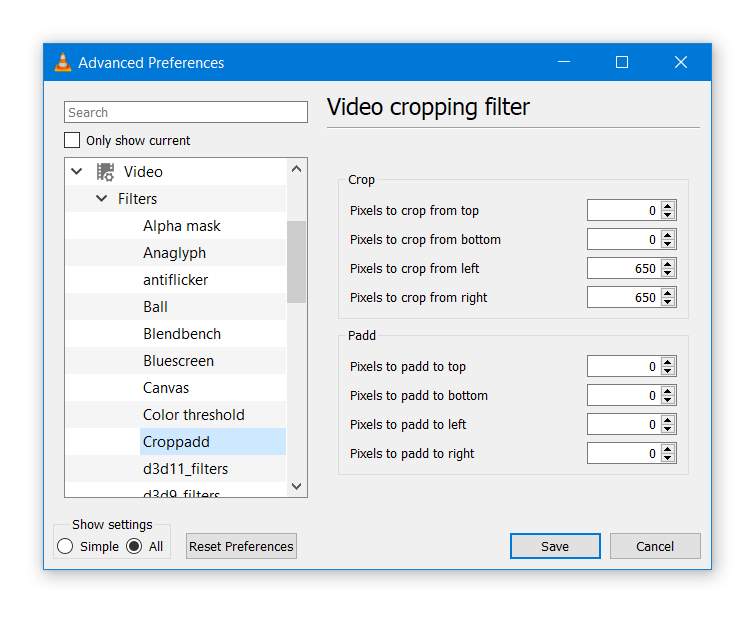
Clicking on Cropadd would open Video cropping filter settings on the right side. Enter the pixel values which you had previously noted down, in the boxes labeled, Pixels to crop from top, bottom, left and right. We entered 650 pixels in the boxes for left and right and left the top and bottom at 0.
Finally click on Save to save the settings. Do not close the VLC player if you want to save the cropped version of the video.
How to Save a cropped version of the original video
After specifying and saving the crop parameters we would use the Convert feature of VLC to save the cropped version of the video as a separate file. To do that, Follow the steps given below.
Step 1
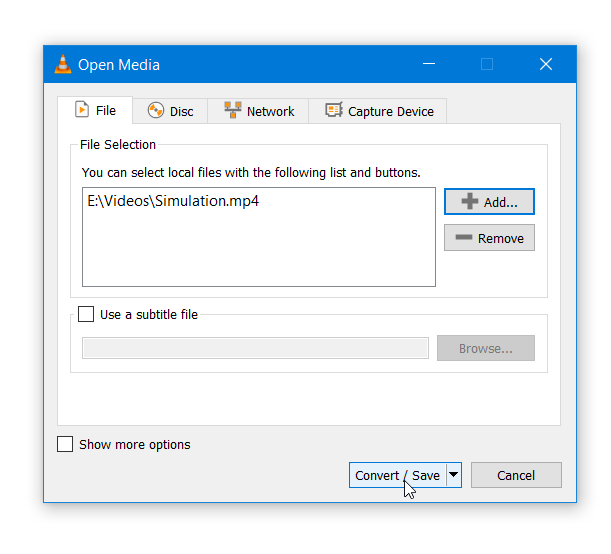
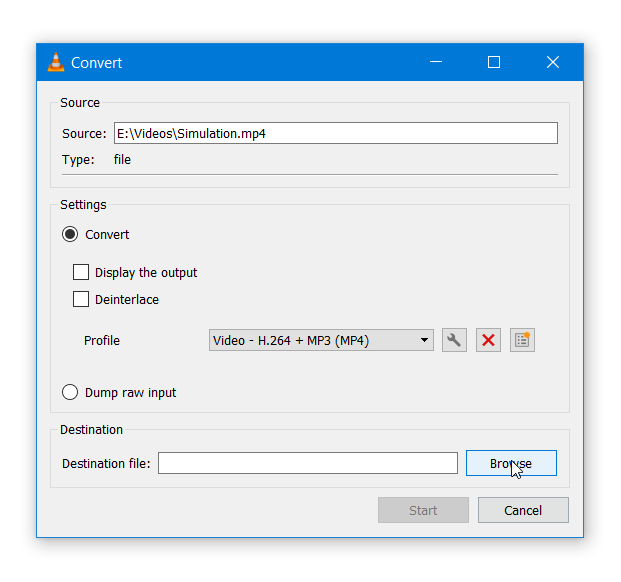
Go to Media menu and click on Convert/ Save (Ctrl + R). Click on +Add button in Open Media window and then navigate to the file location of the video you want to crop. Select the video file and Click on Open to add the video to the Open media dialog.
Step 2
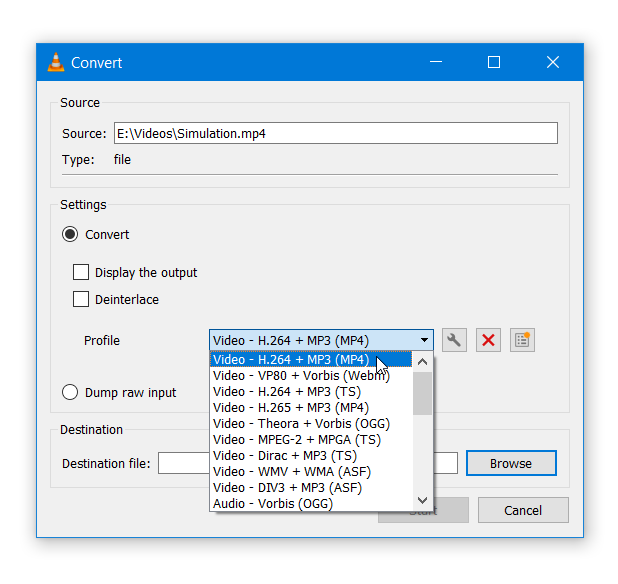
After adding the video click on the Convert/Save button. This will open the Convert Window. The Convert Window under the Source heading would show the path of the file you have selected to crop.
Next, Click on the list box next to Profile and Select, Video – H.264 + MP3(MP4) from the list.
Now, we have to set the location where the cropped video would be saved. To set the Destination file location click on Browse button.
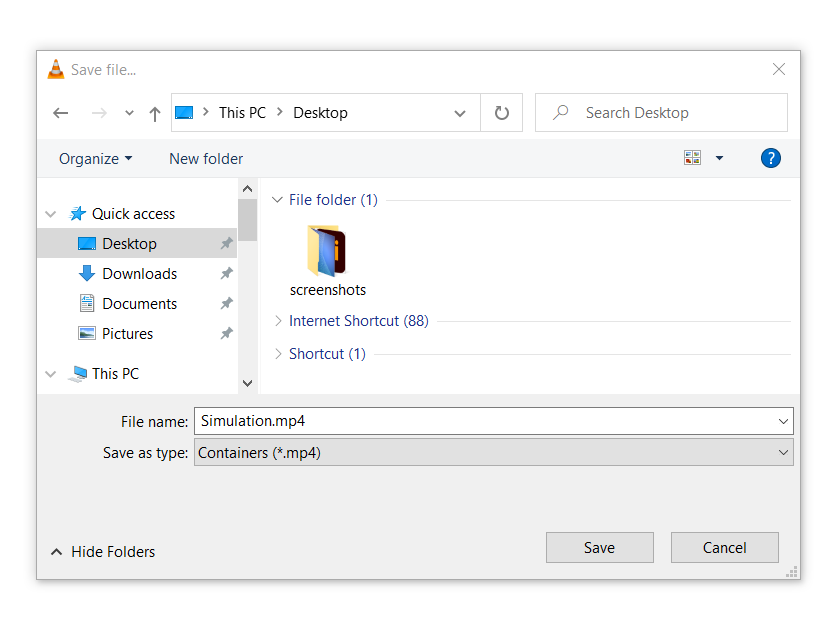
In the Save file… dialog select the Desktop as location by clicking on Desktop in the left side panel. Finally click on Save to get back to the Convert window.
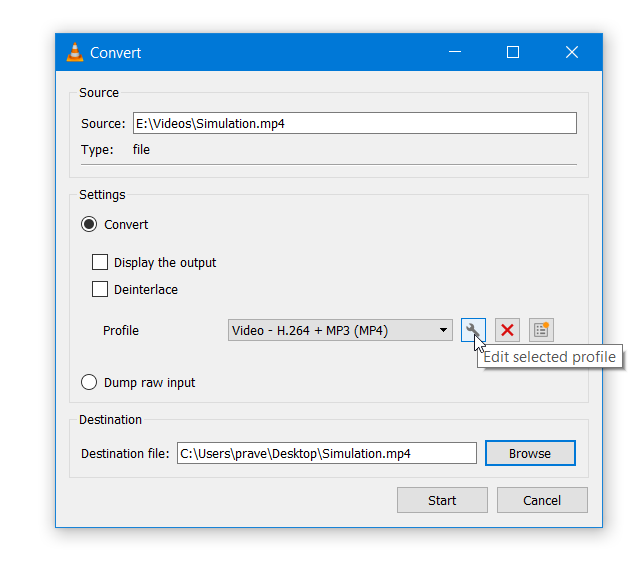
The Convert window would show the source and destination file paths and the Profile should be set to Video – H.264 + MP3(MP4).
Step 3
Now, we have to change the Profile settings to set the video cropping filter for conversion. To do that, Click on the wrench icon next to the Profile dropdown list box.
This will open the Profile Edition window with the Encapsulation tab selected. The Encapsulation tab would already have the MP4/MOV option selected. Select MP4/MOV option if it’s not already selected.
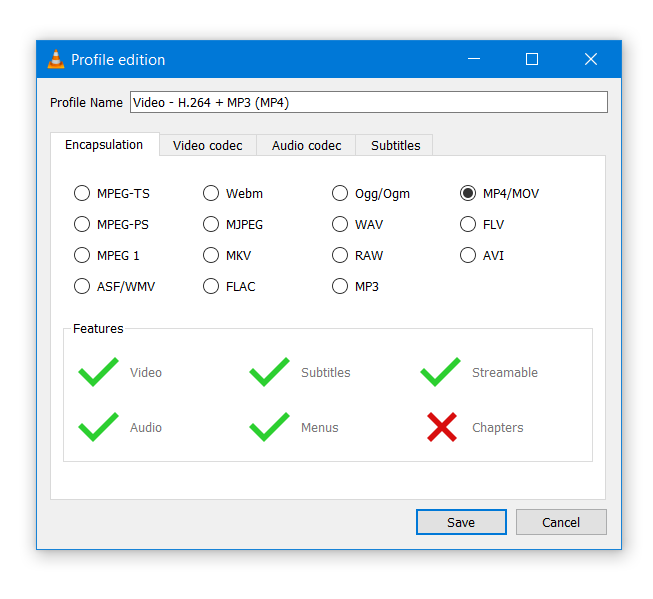
Now, Click on the Video Codec Tab. In the Video codec tab tick the Video check box and untick the checkbox with the Keep original video track label. Leave the values in Encoding parameters and Resolution tabs to default values.
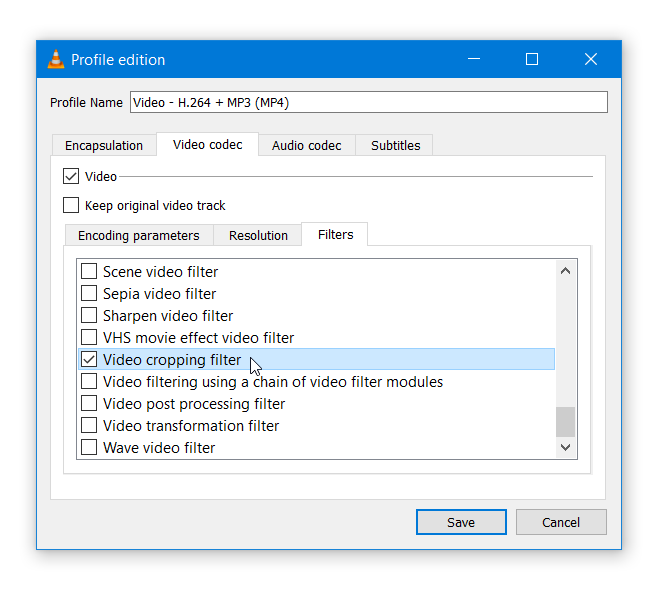
Next, Click on the Filters tab in Video codec tab; then scroll down and select the Video Cropping Filter checkbox. Please, ensure that no other checkbox is selected.
Finally click on Save to save the Profile settings and get back to the Convert window.
Step 4
Finally click on the Start button in the Convert Window to start the conversion of the video.

The conversion time would depend on duration and file size of the source video. Wait for the VLC seeker on the seek bar to reach the end. Your converted video would appear on the desktop or the folder which you specified earlier.
Now, you would have to reset the crop settings to default, else VLC would open all videos in the crop mode. The steps to reset VLC are given below,
Reset VLC
Go to Tools > Preferences or press the CTRL + P shortcut to open VLC preferences. Select All to open detailed settings.
Expand Video in the left side panel. Now expand the Filters submenu under video. Scroll down and select Cropadd.
In the Video Cropping Filter settings on the right, clear the textboxes for the crop value for top, bottom, left and right and set them to 0 pixels. Save the settings by clicking on Save. Close the VLC player. Restart VLC by playing a video.