
Computers running Windows operating systems can automatically synchronize their date and time by connecting to Microsoft time servers. However, if you are not connected to the internet or your CMOS battery is dead then your computer has no way of finding the current time for your region.
Moreover, some of the latest laptop models do not have an RTC/CMOS battery onboard the motherboard and the real time clock draws its power from the primary battery pack. So, if you let your main battery get drained completely or go dead; your computer’s clock would show the wrong date and time when you power it back on.
In situations like these you would either have to change the time and date manually or connect your computer to the internet and let Windows synchronize the time and date with its time servers. You can also try replacing the CMOS battery if your computer clock shows the wrong date and time every time you start your computer.
Here, we have listed the steps to reset or sync your system clock when it is showing inaccurate date or time.
Sync System Time with Windows Time Server in Windows 10 & 11
Windows System time or Taskbar Clock can be fixed by connecting your computer to the internet and then syncing the system clock with those located at time.windows.com. This can be done by opening the Windows “Date and Time” Settings dialog. The steps to do so are given below and are the same for both Windows 10 and 11.
Step 1
Open the Run dialog by pressing the Windows + R shortcut key and enter the following command and hit enter.
timedate.cpl
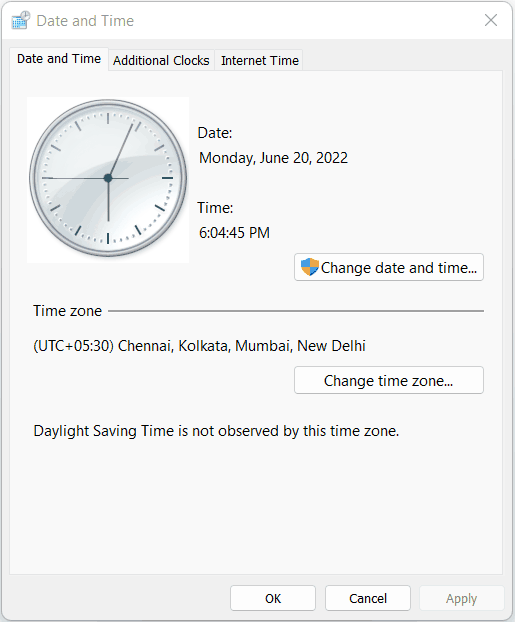
This will open the following “Date and Time” dialog.
Step 2
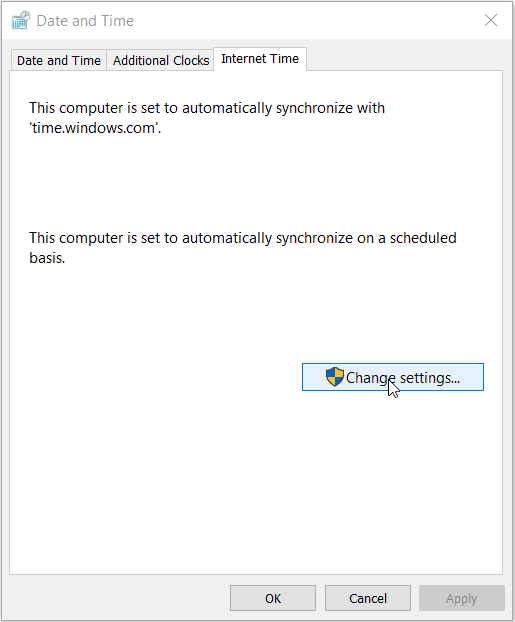
In the Date and Time dialog, select the “Internet Time” tab. Then click on the “Change settings…” button.
Step 3
In the “Internet Time Settings” dialog that appears, make sure that the check box labeled “Synchronize with an Internet time server” is selected. The Server dropdown should show time.windows.com. Now, Click on the “Update now” button.
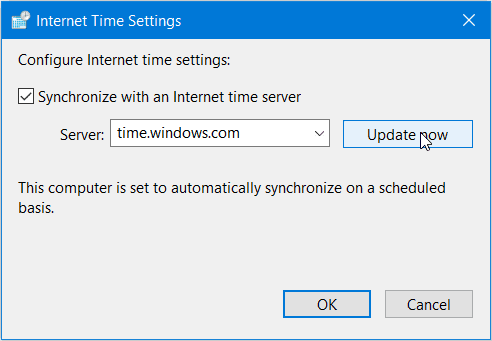
This should synchronize and fix your system date and time. The dialog would show a message with the date and time of the synchronization on successful syncing. Click on OK to close this dialog.
Change the Date and Time Manually in Windows 10 & 11
You can also change the date and time manually if your computer is not connected to the internet and can’t sync with the Windows Time servers. To change the time manually, the steps are given below.
Step 1
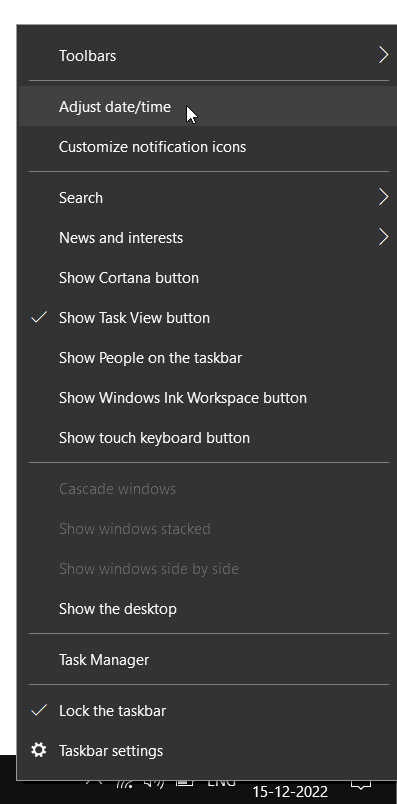
You can open the Date and Time settings page by right clicking on the taskbar clock and selecting “Adjust date and time” option.
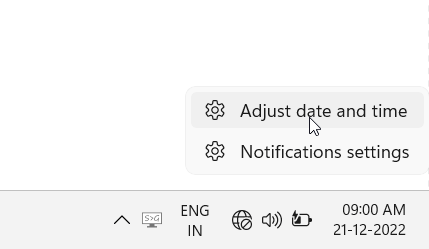
In Windows 10, right clicking on the taskbar clock would open the following contextual menu. Select the “Adjust date and time” option.
Step 2
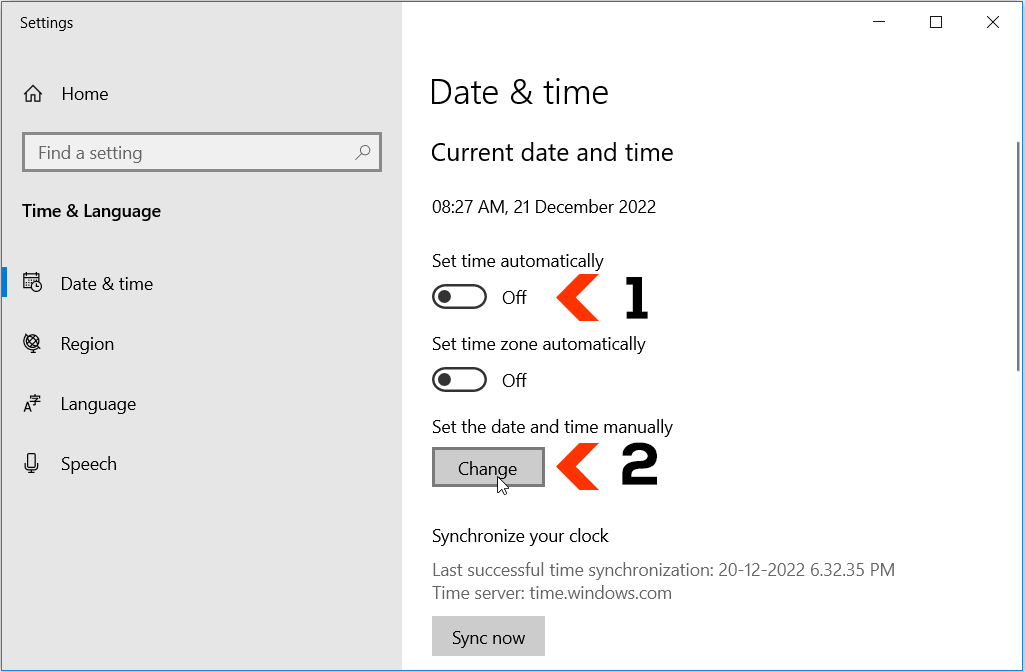
Make sure that the toggle button next to the “Set time automatically” option is toggled Off.
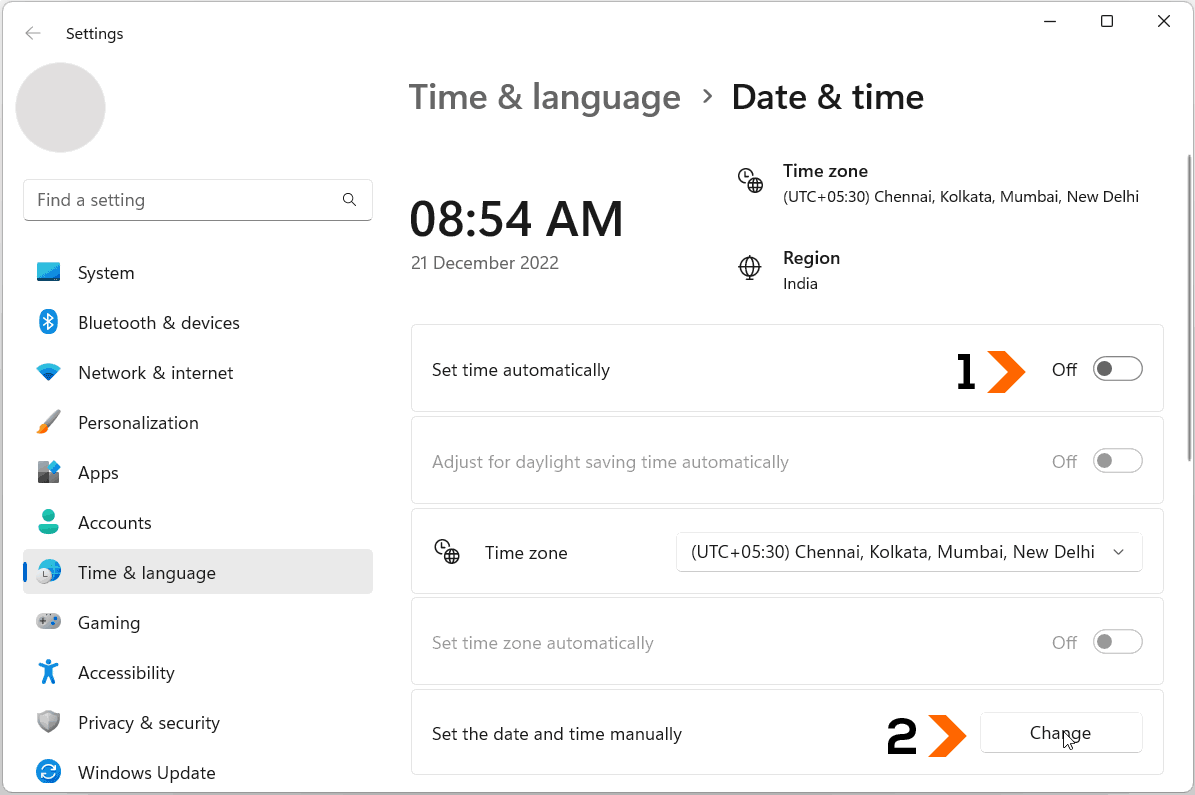
Click on the “Change” button next to the “Set the date and time manually” label. You will have to toggle off the “Set time automatically” label, if the “Change” button is disabled.
In Windows 10, you would see the following settings page for changing the Date & Time. Toggle off “Set time automatically” and click on the “Change” button.
Step 3
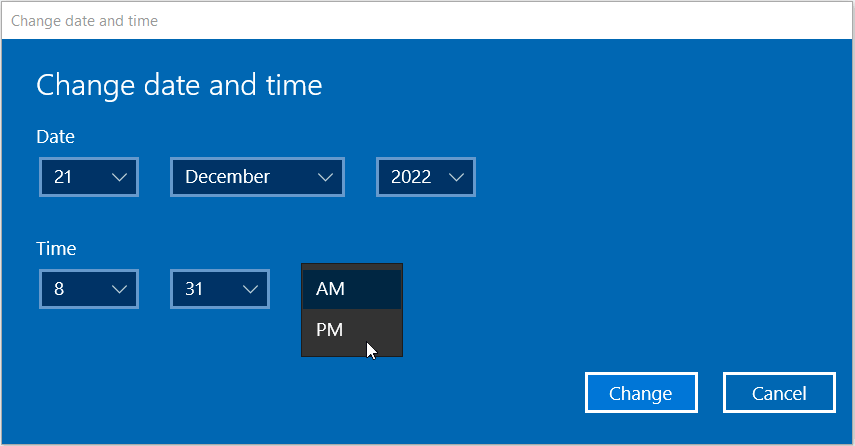
In the following “Change date and time” dialog you can set the date and time manually. Click on “Change” after resetting the date and time.
Method 2
You can also change the date and time using the “Date and Time” dialog.
Step 1
Press the Windows + R shortcut key to open the Run dialog. Enter the following command in the Run dialog and hit enter.
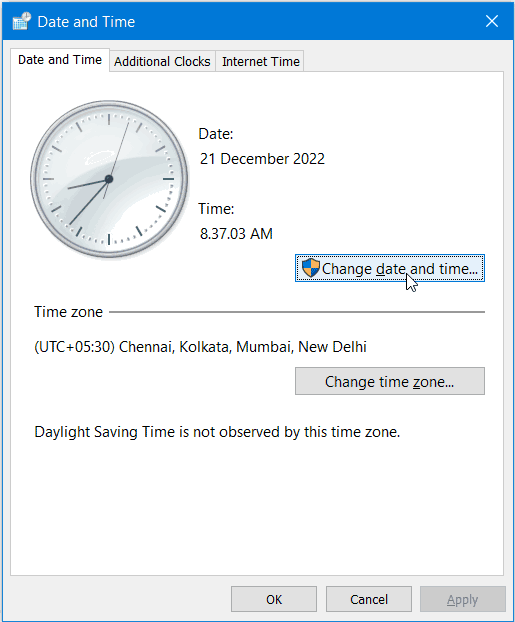
timedate.cplStep 2
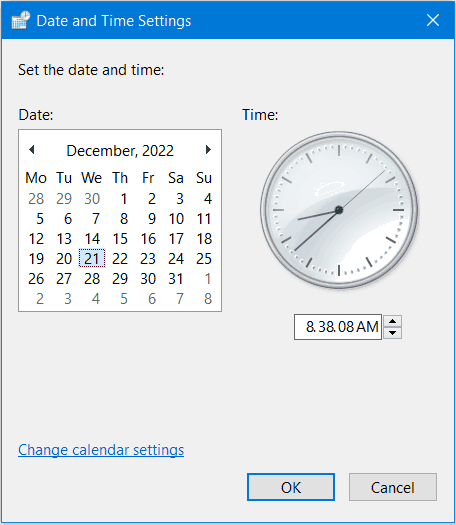
Click on the “Change date and time” button to open the “Date and Time Settings” dialog.
Select the date and use the drop down below the analog clock to change the time.
Select the Correct Time Zone
Make sure that you have selected the correct time zone for your computer. If you are located at or shift to a different location/Time Zone than the one set on your PC, then you may have to select the correct time zone for your computer. You can select the right time zone using the following steps.
Step 1
Press Windows + R shortcut key and enter the following command in the Run dialog.
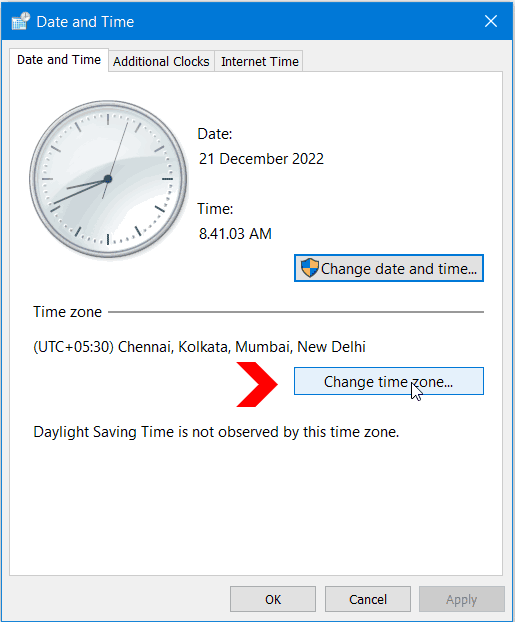
timedate.cplIn the “Date and Time” dialog, Click on the “Change time zone” button under the “Date and Time” tab.
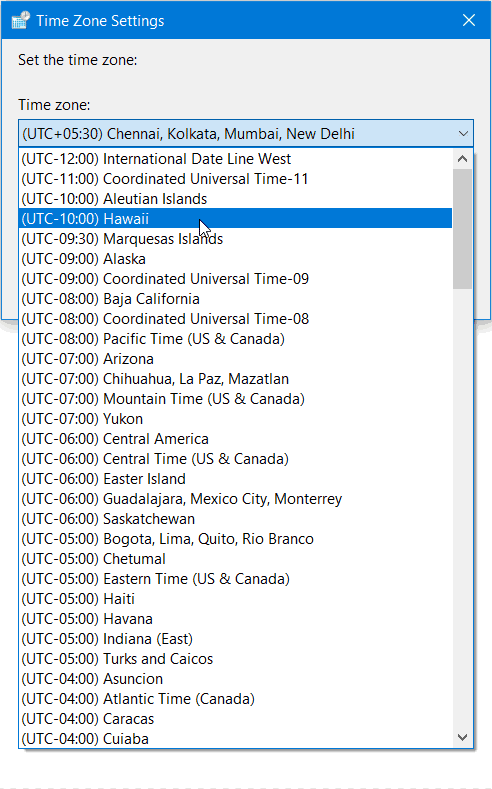
Select your time zone or city from the drop down and click on OK.
Change the dead CMOS/RTC battery
If your computer is frequently resetting to an older default date or time on every boot or restart, then this may be happening due to a dead CMOS battery. CMOS stands for Complementary Metal oxide semiconductor. It’s a type of memory which stores the BIOS configuration settings along with the time information needed by the Real Time Clock responsible for maintaining the system time and date when your computer is in the powered off state.
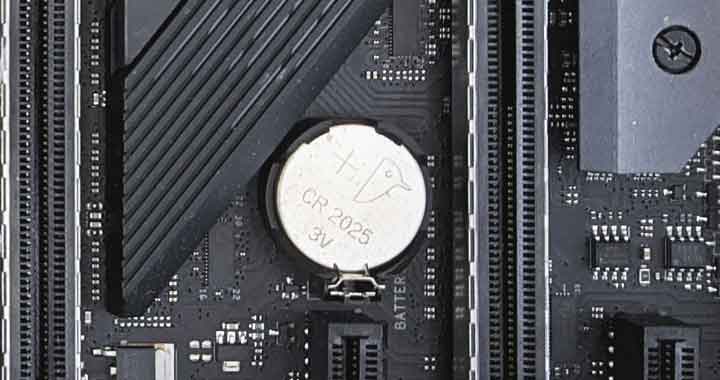
CMOS memory needs a very low operating voltage and can be powered by a 3V coin cell that is present on both laptops and desktops computers. A CR2032 lithium coin cell powers the CMOS and the Real Time clock on most standard series laptops and desktop motherboards.
If this cell is dead, removed or not inserted properly onto the motherboard, then your computer may fail to load the configuration settings while booting. The system clock would reset to an older date on every boot, and you would have to reset or sync the clock every time you start your computer.
In this situation you will either have to replace the coin cell yourself or get it replaced by a technician.
Laptop PCs with no CMOS Battery
Moreover, there are newer laptop models from some manufacturers that do not have a separate CMOS battery. The CMOS and the System Clock draw their power from the main battery. These laptops, without a separate CMOS battery may reset to a default older date and time, whenever your laptop’s battery is drained completely or is removed or disconnected from the motherboard for any reason.
In these laptops, you would have to make sure that the main battery never goes dead or drains completely. You should charge the battery at least once a week even if your laptop computer is not being used. This would ensure that the CMOS, BIOS/Configurations and Real Time Clock have a power source to keep functioning when the laptop is powered off.
If you still run into a situation where your battery goes completely dead, then you should connect the charger for at least half an hour before switching on your laptop computer. Then, either synchronize or change the system time and date after starting your computer, using the steps given above.