
Windows System Files are critical for the smooth functioning of the operating system. A corruption or error in these files may result in an unstable operating system. This will also cause apps to malfunction or crash, may cause data loss or the dreaded Black or Blue screen of death.
File corruption in Windows can happen due to a failing mechanical hard drive with bad sectors. It can also happen when your PC is infected with malware, or an incompatible app or program from untrusted sources is running on your computer. It may also happen when your computer loses power and dies abruptly without shutdown.
If your operating system is crashing frequently and apps are not working as expected then you can try scanning for corrupt system files. Windows maintains a copy of critical system files and also offers various tools to restore these files to their original state. Here, we have enumerated and explained the various methods you can use to fix your computer in case of file corruption.
Update your Computer
Windows Update can fix a lot of issues plaguing your computer especially if you haven’t run Windows Update in a long time or using your PC after a very long break.
Window Update always checks the current state of the System files on your computer and downloads and installs them if they are missing from your computer. Connect to the internet and open Windows Update Settings.
To Open Windows Update settings, Press Windows + R shortcut key and type the following command in the Run dialog.
ms-settings:windowsupdate
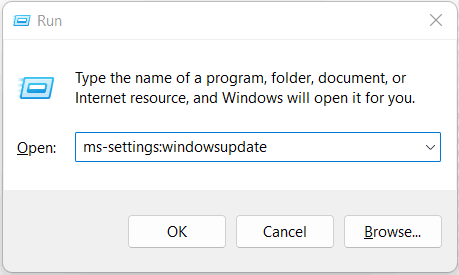
In the Windows Update settings, click on the Check for updates button.

Run System File Checker (SFC) in Windows
System File Checker (SFC) is an inbuilt Windows tool that runs a scan to look for corrupt operating system files. It would scan the core operating system files and then try to repair them if it finds any broken or missing files; using a cached copy.
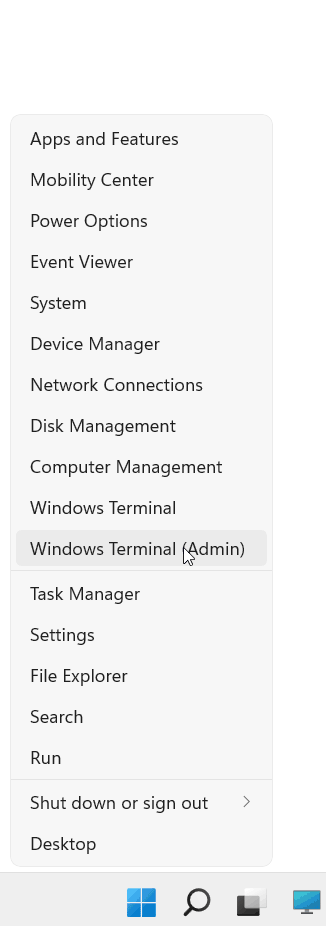
To scan Windows using the SFC command, Press Windows + X keys and then select Windows Terminal(Admin).
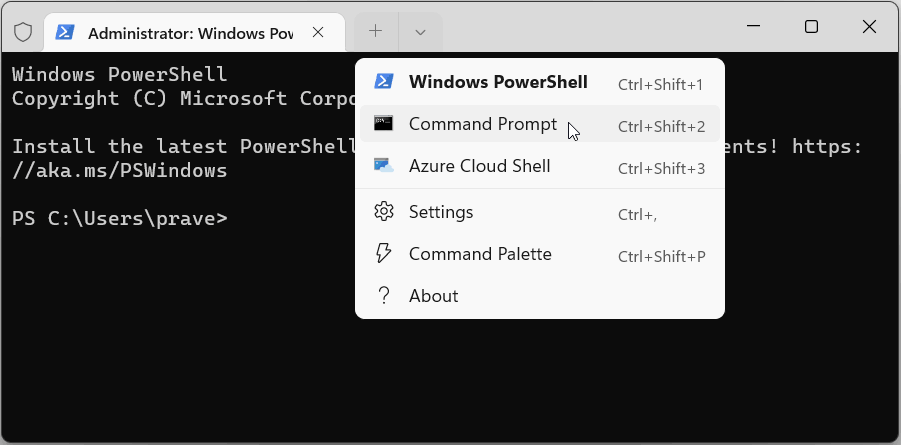
In the Terminal window, click on the down arrow button next to the new tab button. Then select Command Prompt.
Then type or copy-paste the following command in the Command Prompt tab and press Enter. Also, note the space after sfc
sfc /scannow
This will start the System File Checker scan and it will show ‘Verification 100% complete’ message when the scan is complete.
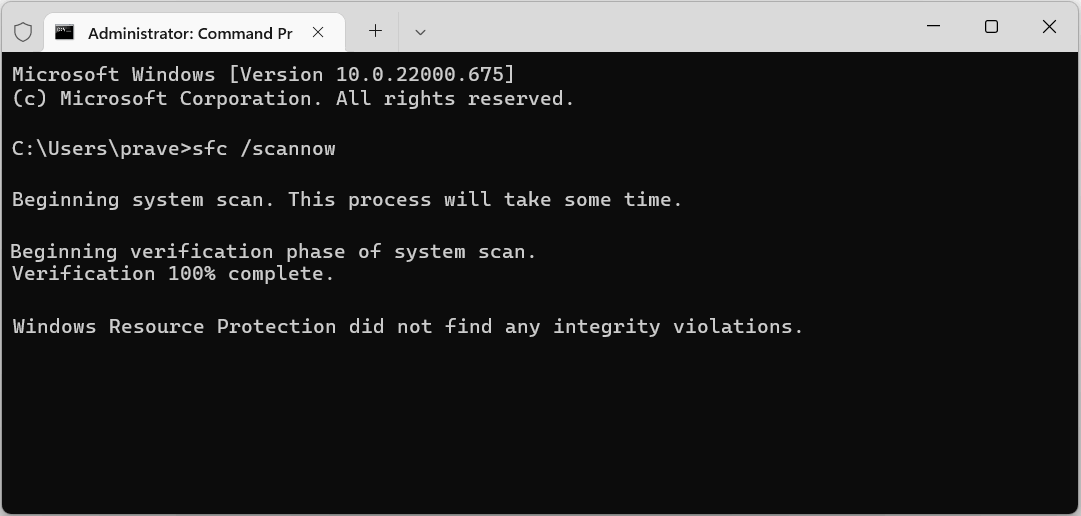
If the SFC scan didn’t find any errors, it would display the ‘Windows Resource Protection did not find any integrity violations’ message.
However, if it finds any error or corruption in the system files, it would automatically try to repair or restore them and display the, Windows Resource Protection found corrupt files and successfully repaired them, message if the files were restored.
Sometimes, you may also get the ‘Windows Resource Protection found corrupt files but was unable to fix some of them’ message, if it fails to repair the system files.
In such a situation you can try running the SFC command again as sometimes running it twice or thrice would fix the issue. If the SFC command fails to fix your computer you can try the DISM command which is explained below.
Scan/Restore Windows System Files using DISM Command
Deployment Image Servicing and Management (DISM) is a command line tool in Windows 11 that can be used to fix the system image files.
To use DISM your computer needs to be connected to the internet as it may need to download Windows System Image files.
Press the Windows + X shortcut and select Windows Terminal (Admin).
Click on the down arrow button next to the new tab button and select Command Prompt.
Type or copy-paste the following command and press Enter. Also, note the space before each /.
dism /Online /Cleanup-Image /CheckHealth
This command would scan the Windows Component Store for inconsistencies but it won’t fix them. It would just report the state of those files.
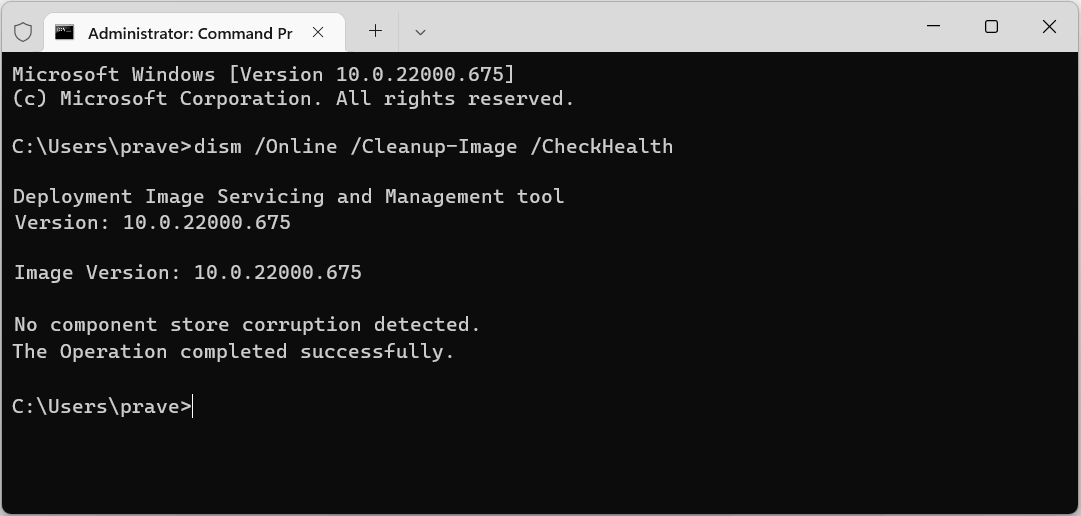
In the above screenshot, it did not detect any file corruption but If it reports any file corruption after the scan results, you can fix those using the DISM/Restore Health command.
Type or copy-paste the following command in the Command Prompt window and hit Enter. (Make sure that your computer is connected to the internet before continuing with these steps).
dism /Online /Cleanup-Image /RestoreHealth
This command would scan for file corruption in the Windows Component Store and would also fix those file corruptions. This process may take time depending on the extent of the file corruption. It would show the progress bar within the Command Prompt Terminal window.
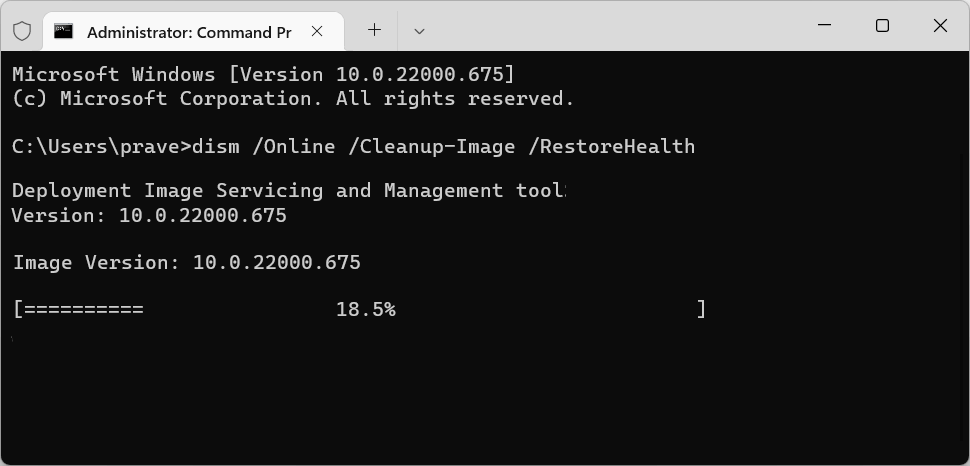
Windows would show ‘The restore operation completed successfully. The component store corruption repaired. The operation completed successfully, messages if any file corruption was fixed.
Use CHKDSK to Scan for Corrupt System Files
Chkdsk is a command line system tool that scans the disks or drives on your computer for file system integrity and fixes logical file system errors if found.
It won’t actively fix or repair your operating system files but it would try to recover data if your hard drive has any bad sectors. It basically fixes the time stamp, file size data errors and marks physical sectors with errors and recovers readable information so that integrity of data on your hard drive is maintained.
This Chkdsk command can be run using the Command Prompt in Windows. Press the Windows + S key to open the taskbar search and type Command Prompt. Click on Run as Administrator to run command Prompt with elevated privileges.

Then type or copy-paste the following command in the Command Prompt window. Also, note the space before every /
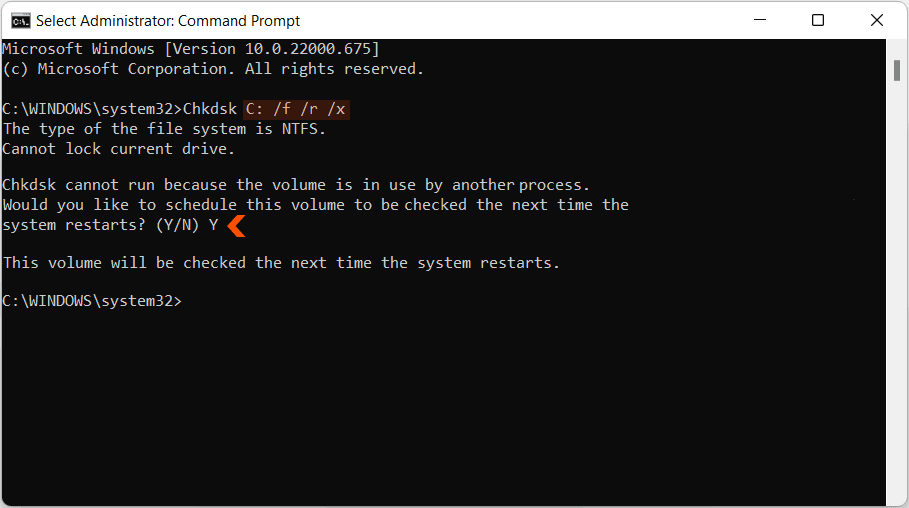
Chkdsk C: /f /r /x
The Chkdsk Parameters in this command tell Windows to scan the C:/ drive or the drive where your operating system files are located. As these files are currently being used by the operating system the drive is not available for scanning.
Therefore, the Chkdsk utility would ask you to schedule the Chkdsk Scan, the next time your computer restarts. Type Y to schedule it.
Now, restart your computer and Windows would run the Chkdsk Utility on System Boot and look for bad sectors and file system errors on your primary drive, before it loads the operating system.
Run Startup Repair
Important Note: Before proceeding with this step, make sure that you have taken a backup of all the files on your computer.
Startup Repair is a part of Windows Recovery Environment and it would fix missing or damaged system files that might prevent Windows from starting correctly. The Startup repair can be accessed from the Advanced Startup Options screen.
You can boot into Advanced Startup Options from within Windows. It is basically a boot menu where you can access Startup Options like Startup Repair, Safe Mode, System Restore and options to Reset your PC.
To boot your computer into the Advanced Startup Options screen do the following.
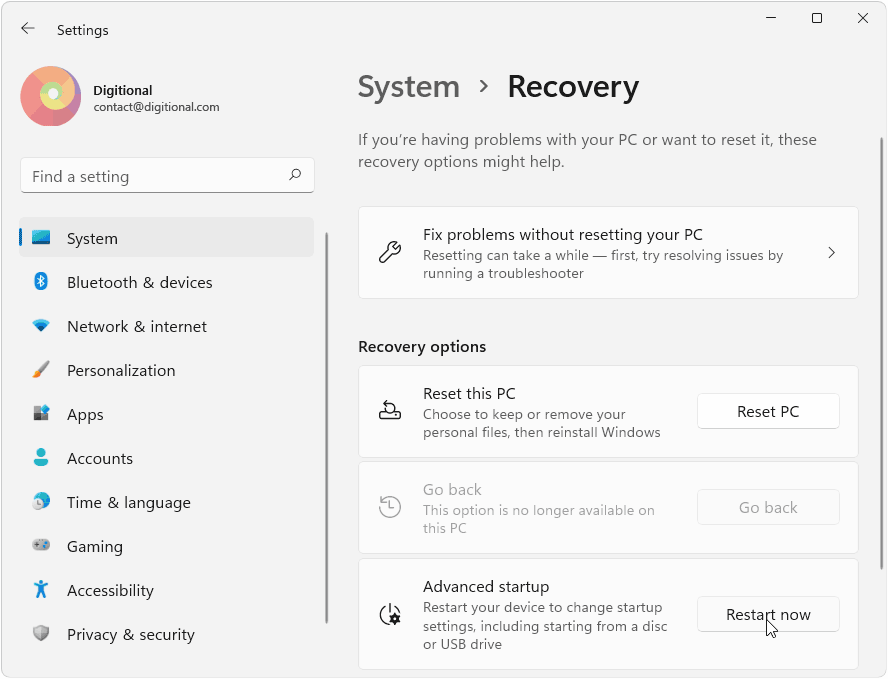
Click on the Start button and then select the Settings app. Then click on System and Choose Recovery on the right side.
Alternatively, you can directly open the Recovery setting using the Run dialog. Press Windows + R shortcut key and then type the following command in the Run dialog.
ms-settings:recovery

This will open the System > Recovery window. Close all programs and apps and then, click on the Restart Now button next to Advanced startup.
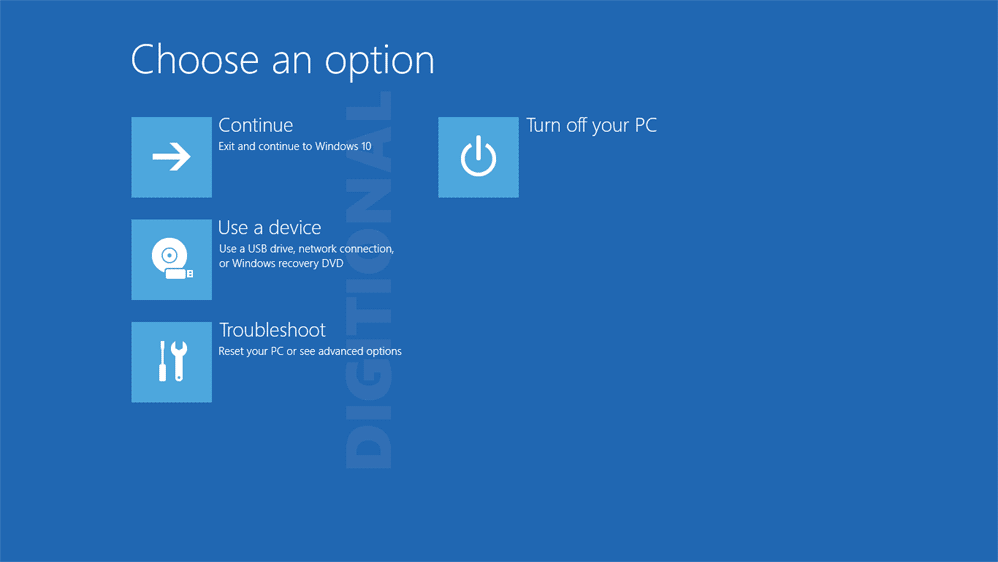
Your computer would restart and load the Advanced Startup Screen. On the Choose an Option screen select Troubleshoot.
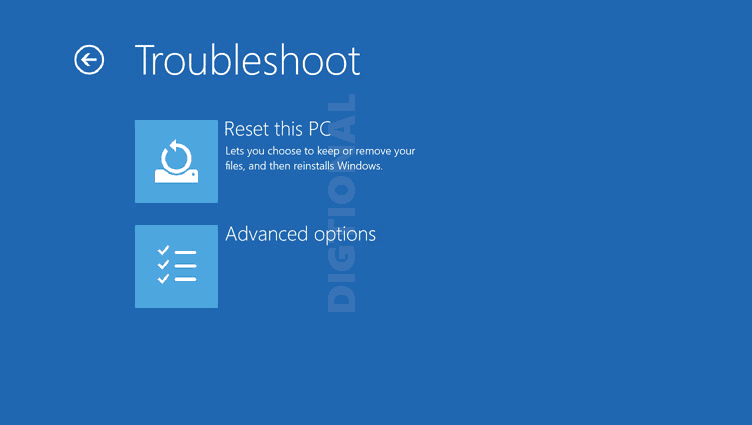
On the next screen select Advanced Options. ( You can also select Reset this PC option to reset Windows.)
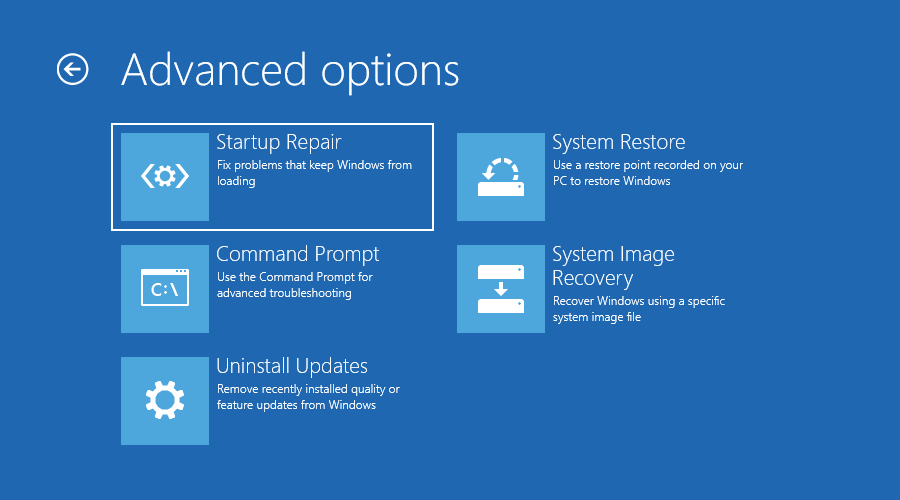
Then select Startup Repair on the Advanced options screen.
However, you may not be able to access Advanced Startup Options if your computer refuses to boot or Windows is unable to load the operating system.
In this situation you can use a bootable Recovery USB drive, explained below.
Use a Windows Recovery USB Drive to Repair Windows 11
A Recovery USB drive can be used to repair or reset your computer when it fails to boot. It contains all the operating system files along with the native windows apps, settings and preferences.

A Recovery USB drive can be created using the Windows Recovery tool which is a part of the Windows 11 operating system. It would take a backup of the current state of your operating system, along with your system settings and preferences. You would need a USB stick with at least 16 GB capacity for creating the Recovery disk.
Read the following tutorial for steps to create a Recovery USB drive and use it to Repair Windows.
How to Create a Windows 11 Recovery USB Drive to Repair PC – Digitional